Quantum Circuits
Gate-based protocols, such as QEC procedures, are described in terms of quantum
circuits. In PECOS the data structure used to represent quantum circuits is simply
called QuantumCircuit. This class was designed with similar methods as the commonly
used data structures in Python such as list, dict, and set. This choice
was made so that users accustomed to Python data structures would find QuantumCircuit familiar and, hopefully, easy
to use.
The QuantumCircuit data-structure was particularly designed to efficiently represent the quantum circuits of QEC
protocols. During each time step (tick), in QEC circuits many gates of just a few gate-types are applied to most of the
qubits in the QECC. QuantumCircuit is a data structure that represents a sequence of ticks, where for each tick a
collection keeps track of what few gate-types are being applied and, for each of these types, what qubits are being
acted on. We will see examples of this in the following.
Note, in the following I will refer to “qudits” rather than “qubits” since a QuantumCircuit could represent a
sequence of qudit operations.
Attributes
|
A |
|
A |
Methods
|
Appends a collection of gates all belonging to a single tick. |
An Instance
To represent a quantum circuit, such as as the preparation of the Bell state \(\frac{1}{\sqrt{2}}\left(|00\rangle + |11\rangle \right)\), seen here
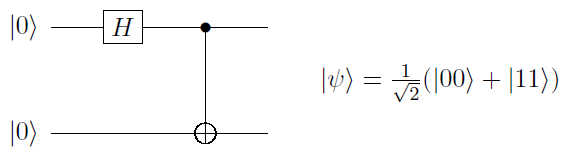
we begin by creating an instance of QuantumCircuit:
>>> import pecos as pc
>>> qc = pc.circuits.QuantumCircuit()
A string representation of the QuantumCircuit can then be obtained:
>>> qc
QuantumCircuit([])
Here, that the object is a instance of the QuantumCircuit class is indicated by QuantumCircuit(). The brackets
[] indicate an empty sequence.
If needed, empty ticks can be reserved when instantiating a QuantumCircuit:
>>> qc = pc.circuits.QuantumCircuit(3)
>>> qc
QuantumCircuit([{}, {}, {}])
Here, each tick is represented by a pair of braces {} and is separated by a comma. We will see later that the method
update can used to add gates to empty ticks.
Modifying a QuantumCircuit
Next, we discuss how the methods append, update,
and discard are used to alter a QuantumCircuit.
Append
We can add a tick containing some gates to the end of a QuantumCircuit by using the method append. Doing so
allows us to represent the Bell-state prep circuit:
>>> qc = pc.circuits.QuantumCircuit()
>>> qc.append('init |0>', {0, 1})
>>> qc.append('H', {0})
>>> qc.append('CNOT', {(0,1)})
>>> qc
QuantumCircuit([{'init |0>': {0, 1}}, {'H': {0}}, {'CNOT': {(0, 1)}}])
Here in the final line we see a string representation of the quantum circuit in Fig 6.1. As indicated by the string, gates of the same type are grouped together. Each gatetype is indicated by a symbol (string). The standard symbols use for qubit gates in PECOS are given in appendix B. Other symbols can be used by PECOS so long asthe symbols are hashable and recognized by the state-simulator used in apply the quantum circuit (see Simulators for state simulators).
Paired with each gate symbol is set of gate locations, which are integers or tuples of integers. Integers are used to index qudits. Tuples are used to indicate qudits that are acted on by multi-qudit gates. The order of the qudit indices in a tuple may matter. For example, for a CNOT the first qubit is the control qubit while the second, is the target.
The above code block shows how to append a tick that consists of only one gate type. We can also append multiple gate-types per tick:
>>> qc = pc.circuits.QuantumCircuit()
>>> qc.append({'init |0>': {0, 1, 2, 3}})
>>> qc.append({'H': {0, 2}, 'X': {1, 3}})
>>> qc.append('CNOT', {(0,1), (2, 3)})
>>> qc
QuantumCircuit([{'init |0>': {0, 1, 2, 3}}, {'H': {0, 2}, 'X': {1, 3}}, {'CNOT': {(0, 1), (2, 3)}}])
Both QuantumCircuits and gates may have extra information that we wish to include. Such information can be added to
the QuantumCircuit by including extra keywords as seen here:
>>> qc = pc.circuits.QuantumCircuit(a_var=3.0)
>>> qc.append('init |0>', {0, 1}, duration=5)
>>> qc.append({'H': {0}, 'X': {1}}, duration=1)
>>> qc
QuantumCircuit(params={'a_var': 3.0}, ticks=[{'init |0>': loc: {0, 1} - params={'duration': 5}}, {'H': loc: {0} - params={'duration': 1}, 'X': loc: {1} - params={'duration': 1}}])
As we can see in this example, extra keyword arguments are gathered into the dicts referred to as params. We will
see later how the information in the params can be retrieved.
Note, the append method associates the extra keywords with all the gates in the tick. This limitation can be
overcome by the update, which is discussed next.
Update
The update method of QuantumCircuit adds additional gates to a pre-existing tick. An example of using update
is seen in the following:
>>> qc = pc.circuits.QuantumCircuit()
>>> qc.append({'X': {0, 1}, 'Z': {2, 3}})
>>> qc.append({'H': {0, 1}})
>>> qc.update({'CNOT': {(6, 7), (8, 9)}, 'H': {10, 11}}, tick=0)
>>> qc.update('X', {4, 5})
>>> qc
QuantumCircuit([{'X': {0, 1}, 'Z': {2, 3}, 'CNOT': {(8, 9), (6, 7)}, 'H': {10, 11}}, {'H': {0, 1}, 'X': {4, 5}}])
By default, update adds gates to the current last tick of the QuantumCircuit. The tick keyword can be used to
specify a tick. Each tick is index by an integer starting with 0.
Note, update will not override gate symbol-location pairs in the tick; instead, it will only add additional gate
locations.
Like append, update accepts other keyword arguments and stores such information in the params dict:
>>> qc = pc.circuits.QuantumCircuit(1)
>>> qc.update('X', {0, 1}, duration=3)
>>> qc.update('H', {2, 3}, duration=2)
>>> qc
QuantumCircuit([{'X': loc: {0, 1} - params={'duration': 3}, 'H': loc: {2, 3} - params={'duration': 2}}])
Note, since gates in a tick should be parallel operations, if more than one gate acts on a single qudit during a gate,
an Exception is raised.
Discard
If needed, gate locations can be removed using the method discard. This can be seen in the following:
>>> qc = pc.circuits.QuantumCircuit()
>>> qc.append('X', {0, 1, 2})
>>> qc.discard({1})
>>> qc
QuantumCircuit([{'X': {0, 2}}])
A tick keyword can be used to specify which tick the gate is discarded from. If no tick is specified, then
discard removes gates from the last tick.
Retrieving Information
Next, how to retrieve information from a QuantumCircuit will be dicuss, for example, through attributes or for
loops.
Number of Ticks
The number of ticks in a QuantumCircuit can be obtained using Python’s code{len} function:
>>> qc = pc.circuits.QuantumCircuit(5)
>>> len(qc)
5
>>> qc
QuantumCircuit([{}, {}, {}, {}, {}])
Active Qudits
The QuantumCircuit data structure keeps track of which qudits have been acted on during a tick. These qudits are
known as active qudits. The active_qudits attribute can be used to retrieve a list of these qudits:
>>> qc = pc.circuits.QuantumCircuit()
>>> qc.append({'X': {0}, 'Z': {2, 3}})
>>> qc.append({'CNOT': {(0, 2), (1, 3)}})
>>> qc.append('H', {2})
>>> qc.active_qudits
[{0, 2, 3}, {0, 1, 2, 3}, {2}]
This information can be useful if one wants to apply errors to inactive qudits.
For Loops
The QuantumCircuit class has the generator items, which can be used to iterate over the circuit and obtain a
sequence of gate symbols, locations, and params:
>>> qc = pc.circuits.QuantumCircuit()
>>> qc.append({'X': {3, 5}, 'Z': {0, 1, 2}}, duration=1)
>>> qc.append({'H': {0, 1, 2, 3}})
>>> qc.append({'measure Z': {0, 3, 5}})
>>> for gate, gate_locations, params in qc.items():
...     print('%s -> %s, params: %s' % (gate, gate_locations, params))
X -> {3, 5}, params: {'duration': 1}
Z -> {0, 1, 2}, params: {'duration': 1}
H -> {0, 1, 2, 3}, params: {}
measure Z -> {0, 3, 5}, params: {}
One can loop over a single tick by using the keyword tick:
>>> # Following the previous example
>>> for gate, gate_locations, params in qc.items(tick=0):
...     print('%s -> %s, params: %s' % (gate, gate_locations, params))
X -> {3, 5}, params: {'duration': 1}
Z -> {0, 1, 2}, params: {'duration': 1}